Category Archives: Koi and Ponds
Utsuri – Shadow and Light by Bryan Bateman
Shiro Utsuri (pronounced SHE-row oot-SOO-ree) is a member of the Utsuri class at koi shows, which also includes Ki Utsuri (yellow and black), and Hi Utsuri (red and black). Of these three, the Shiro Utsuri, or white and black koi, is by far the most popular, and will often compete with Gosanke – Kohaku, Sanke, and Showa – for Grand Champion at koi shows.

Shiro Utsuri
“Utsuri” translates from the Japanese as “reflection”, which refers to a tendency these koi have of displaying alternating markings, much like a checkerboard, on their bodies. Modern patterns vary, however, from the traditional checkerboard type to a limitless array of artistic interpretations. We see banded “bumble-bee” patterns, or we may see continuous “inazuma” or lightning type patterns that run to and fro over the entire koi from head to tail, or maybe a koi with just a few brush-mark splashes of sumi seeming to float on a sea of white.
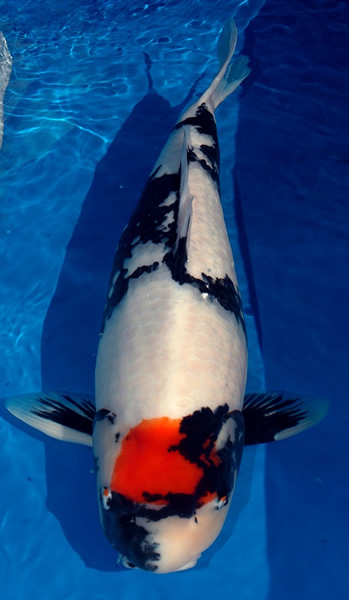
A similar variety often confused with Shiro Utsuri is Shiro Bekko, which is also a black and white koi. The difference between these two types lies in the location and shape of the black markings. While Utsuri normally exhibit larger, wrapping black markings, which will often appear on the head as well as on the body, Bekko are distinguished by the small stepping-stone type of markings appearing on the body but not on the head, much like we see on Sanke.
The ratio of black to white on a Shiro Utsuri is largely a matter of personal preference, but in koi shows, a Shiro exhibiting a greater proportion of white to black will generally fare better.

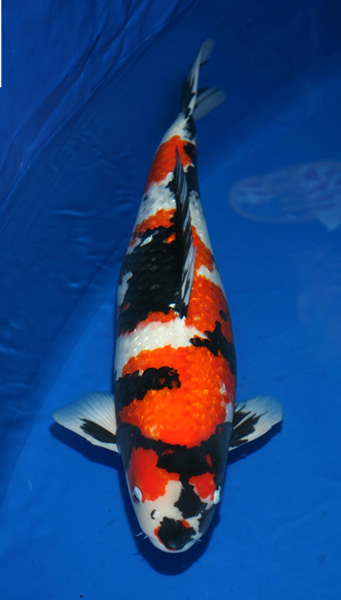
Shiro Utsuri – inazuma and motoguri
Other appreciation points are that the pectoral fins should have moto guro, or black patches, at the base of each fin, and that the other fins should be all or mostly white.
The black pattern should have an artistic balance that is pleasing to the eye, with not too much front vs back or side vs. side, and there should be some black on the head region – preferably forming an eye-catching complement to the overall pattern. This contrast of black and white, with no other colors, creates a beautiful and intriguing fish which will complement any koi pond.
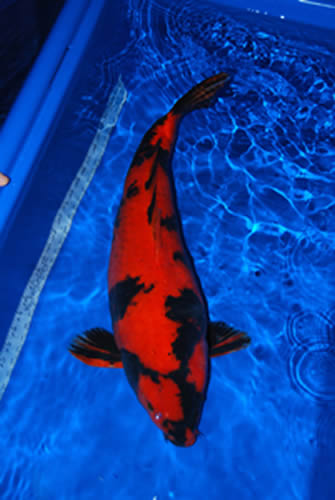
Hi (red) Utsuri
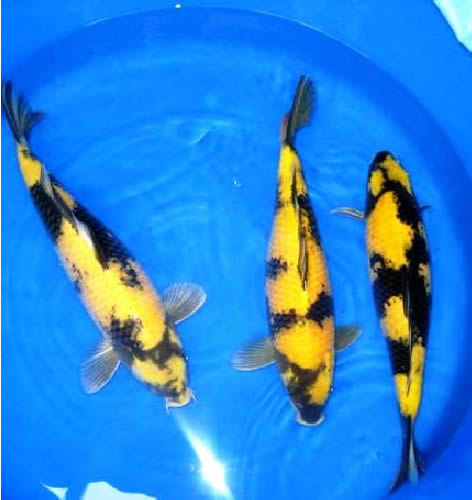
Ki (yellow) Utsuri
© Bryan Bateman 2009
Kumonryu – The mysterious ever-changing koi by Bryan Bateman
One of the most interesting varieties from a developmental standpoint is the black and white, scale-less Kumonryu. It comes from a long line of koi beginning with a dark-colored magoi variant called a Tetsu Magoi. From crosses with this koi many years ago an all black koi was developed called a Karasu (crow).
Some of these koi had white fin tips, which were singled out and further cross-bred to create koi with more and more white. Eventually a black koi with a white head and white fins was developed called a Yatsushiro.
The first kumonryu, which is merely a doitsu (scaleless) version of a yatsushiro, was created when a shusui (doitsu koi with red lateral markings and a bluish body color) was crossed with a yatsushiro.
One way to tell a kumonryu from a doitsu shiro utsuri (also a black and white scaleless koi) is to look closely at the white skin. A kumonryu will have a bluish tint, inherited from its shusui parent.
The other difference between the two is the genetic tendency of the sumi (black) to appear as a wrapping pattern on Utsuri, while it appears more as a lateral-type pattern (running lengthwise) on Kumonryu.
Kumonryu All- Japan 2008

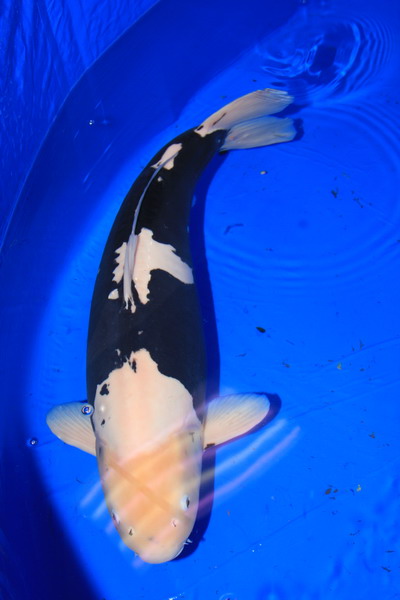
Kumonryu (Ray Jordan)
From the first kumonryu many breeders have developed variations in the patterning, including some truly spectacular specimens reminiscent of a killer-whale type of pattern. The problem is, these koi have a nasty habit of changing colors from season to season (black becomes white and white becomes black!) and also changing their patterns from year to year, so that you may not even recognize your own koi if you don’t watch it closely!
For this reason, it is difficult to select a baby kumonryu. They tend to develop more black as they mature, so some hobbyists recommend purchasing predominantly white babies. If you really want to increase your chances of getting a good specimen, and your budget and pond can handle it, perhaps purchasing two or three of them would make sense. These koi are a lot of fun to own and provide endless fascination as they change their patterns from season to season and from year to year.
© Bryan Bateman 2009
Ochiba Shigure – Autumn Leaves on Water by Bryan Bateman
Have you ever seen a soft gray colored koi with gold patterning? If you have, you likely would not forget, because it is very different looking than the brightly colored koi we are used to seeing. This quietly refined and elegant koi is called an Ochiba Shigure, which aptly translates to “autumn leaves on water”. The delicately reticulated scales do indeed give an impression of leaves floating on a calm pond, with the golden-leaved trees reflected on the surface.
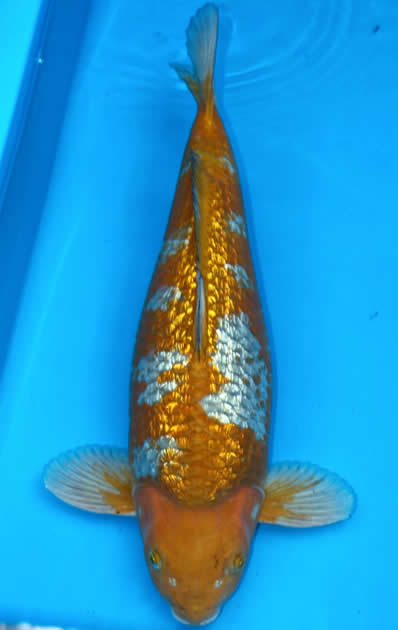
Ginrin Ochiba

nordic 53cm ochiba
A relative newcomer on the koi scene, having been around only since about the mid-90s, the Ochiba is actually a cross between a gray Soragoi and a golden brown chagoi. These two ancestors have a reputation of being the friendliest of koi, and the Ochiba has happily inherited that trait. Many hobbyists will have one of these types koi in their collection for the purpose of encouraging other, shyer koi to “come out of their shells” and be more sociable. They will be the first to come up to greet you as you approach your pond, and will readily eat from your hand.
For show purposes, they are usually grouped with the “kawarimono” class, which is a catch-all for many of the lesser-known varieties. However, due to their increasing popularity, some shows have a special award for best Ochiba. There are many newer types of Ochiba as well, including a scale-less Doitsu Ochiba, a sparkling ginrin Ochiba, and most recently a metallic doitsu ochiba. Another sub-variety has been a cross between a red and white Kohaku and an Ochiba, giving an attractive gray and red patterned koi.
If you want a friendly new addition to your pond, and you enjoy the understated softness of earth tones that remind one of the colors of fall, Ochiba Shigure might be your koi.
© Bryan Bateman 2009
Ginrin – Diamonds by Bryan Bateman
Many of us when new to the koi hobby are attracted by those “sparkly” little koi that seem to be covered with diamonds. These are known as “ginrin” koi. GinRin is not a variety per se, but a characteristic that can be seen on any scaled koi. The Japanese pronunciation sounds like “geenleen”, but it has been Americanized by most to sound just like it looks, with a hard ‘G’. It translates to “silver scale”, and is sometimes referred to as “KinGinRin”, or “Gold and silver scale”. This is because, when ginrin appears on a red fish such as a kohaku, it sometimes has a gold appearance. This silver effect is due to the presence in the scale of a chromatophore called guanine, which was first noticed in a random spawning in Japan in 1929.

Ginrin Kohaku
Ginrin Showa

Ginrin Ochiba
There are actually four distinct types of GinRin scales. The most common is known as “diamond gin”, and appears much like cracked glass over the entire scale. A highly valued type, and hard to find in this country, is called “Beta Gin”, which is characterized by the entire scale being covered with silver, much like a mirror. A third type is “kada gin”, or “edge gin”, which is exactly as it sounds – each scale is edged in silver. The last, and by far rarest, is pearl gin. On this type, the gin appears only in the center of the scale, and truly looks as though someone carefully mounted a diamond on each scale.
When selecting a young ginrin koi, look for those with at least three rows of ginrin scales on either side of the dorsal fin. These scales should be evenly lined up in neat rows and of consistent shine. I can remember when I was new to the hobby and looking at a young ginrin with jumbled ginrin scales. The dealer told me not to worry, that they will line up as the fish grows. Didn’t happen, and never will!
Appreciation of ginrin can be a very personal and subjective point. Some hobbyists feel that it is a distraction, particularly in patterned koi. It can certainly be a beautiful enhancement to one-colored koi such as cha-goi and yamabuki ogon. Whatever your preferences, any collection will benefit from the presence of one or more of these “living jewels.”
© Bryan Bateman 2012
Tancho – The Crane by Bryan Bateman
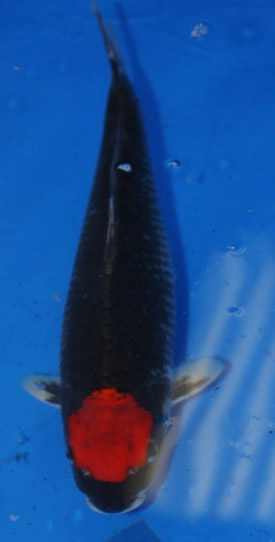
A tancho is any koi with red located only on the head. If it has red anywhere on the body other than the head, it is no longer considered a tancho. Named for the Tancho Crane, and very popular in Japan due to the similarity of this type of marking to the Japanese flag, tanchos have their own class in koi shows. This class generally includes tancho kohaku, tancho sanke, and tancho showa, but may include other types of tancho as well, such as tancho goshiki, tancho beni kumonryu, or tancho ochiba. The inclusion of these other types of tancho is determined by each club and show chairman.
Tancho Goshiki

Tancho Kohaku
Tancho Showa
The tancho marking may have many shapes, however a round shape is considered ideal. The size of this mark should be as large as possible without going past the eyes, back onto the beginning of the scales, or too far forward on the forehead, and it should be centered. Other shapes sometimes seen are square, cross-shaped, or irregular flowery-type shapes. Any of these are acceptable on a tancho as long as they are uniformly shaped, are centered on the head, and have a pleasing look to the eye.
Purchasing a young tancho can be risky as they frequently will lose the tancho mark as they mature. It is best to buy them at two or three years of age, as the mark will generally be stable by this time. You want to look for a tancho marking that appears thick, with no windows or light areas, and with clean, sharp edges. In the case of tancho sanke or tancho showa, look for a pleasing, well-balanced sumi (black) placement to complement the red marking. My favorite is tancho showa, especially the ones with black partially covering the tancho mark – giving the appearance of clouds passing in front of a full harvest moon.
© Bryan Bateman 2012
Yamabuki Ogon by Bryan Bateman
|
Yamabuki Ogon
 |
The history of the development of metallic koi is an interesting one. About 90 years ago, a Japanese hobbyist by the name of Sawata Aoki had a dream to create a special type of koi. When he heard that a young boy had found a wild carp in a river which had golden stripes on it, he walked many miles to see this carp, and convinced the boy to sell it to him. He carried his new treasure home and spent the next 25 years patiently breeding and selecting the brightest and shiniest offspring until, in 1946, he finally achieved his dream – the first metallic koi. This koi soon came to be called a Yamabuki Ogon, and is the original ancestor of all metallic koi that we have available to us today.
Today Yamabuki Ogons are one of the most popular of varieties. Although extremely expensive when first made available to Japanese collectors, they can now be had at prices well within the budget of most hobbyists. They are hardy, grow quite large, and are generally the friendliest of koi. Their bright shiny yellow color will attract your eye especially as the sun strikes them.
© Bryan Bateman 2014 |
The Elusive Beni Kujaku by Bryan Bateman
One of the more interesting and attractive developments in recent years has been the modification and improvement of a popular variety known as the Kujaku (“peacock” in Japanese) The first Kujaku was created in 1960 by crossing a matsuba ogon and a hariwaki. The result was a metallic koi with reticulated scales and a pattern of yellow, orange, or various shades of red on a white background. The Kujaku became an instant hit with collectors. For show purposes, Kujaku is placed in the Hikarimoyo class, competing against other patterned metallics including hariwaki, kikusui, yamatonishiki (metallic sanke), and metallic bekko. Due to the added refinement of the reticulated scales, the Kujaku has a definite advantage over the other members of this class, and is most often selected as “best in class” for hikarimoyo.

Beni Kujaku
Occasionally a Kujaku would be seen with a deep rich red pattern, but it was a rarity as the hariwaki lineage most often results in yellow to orange shades. Recognizing a demand for the red (beni) Kujaku, breeders embarked on the goal of developing a Kujaku with consistently red coloration. A breeder in Niigata, Japan, by the name of Koneko, became the first to achieve this. He reputedly crossed a traditional Kujaku with either a metallic Kohaku or a red Kikusui, and the result has been a new line of beni Kujaku which have become the standard of the breed.
When selecting a young Kujaku for your collection, look for a koi with excellent metallic sheen. Also, check for even, sharp reticulation on all scales. On a tosai (one-year-old koi) this reticulation may not be “up”, so if you are not sure of the breeder it may be best to purchase Kujaku at two years old, when the reticulation is more likely to be developed. The head should be clean and white with no smudging or black markings, and the fins should be a lustrous silvery color. As always, look for a healthy koi that appears to be curious and actively swimming with its tank mates. The pattern on a Kujaku should resemble that of a Kohaku. In other words, pleasing to the eye and balanced from head to tail and side to side. A simple two or three-step pattern seems to work very well with the reticulation. A busy pattern can look too chaotic when coupled with the reticulation.
It can be a challenge finding the “right” Kujaku for your tastes, but when you finally find that elusive red Kujaku, you should consider adding it to your collection.
© Bryan Bateman 2014
THE INS AND OUTS OF KOI POND BUILDING by Mike White, White Water Filters PART 1: Planning
PART 1: Planning
Are you thinking about building or having a koi pond built? In this series of articles I will discuss how to build a koi pond. Why is it important for you to read this article prior to “digging in”? Because quite frankly there are many people in the pond industry that are telling people things that are not true, just to sell their products. Or, they installed a system themselves and feel it is the best.
Why should you take the time to read what I have to say? I have been involved with the koi hobby for over 25 years. I see more than 100 different ponds every year. I sell, install and maintain many different types of pond and koi products. I have worked with both old technology and cutting edge technology. I have written articles for various pond related publications and have conducted seminars. And I will be the first to tell you that there is no such thing as a “perfect” system.
What make a koi pond different from any other pond? The first thing is that this is a pond designed to house large fish, a type of carp, koi. In a large area they can easily be raised to a size in excess of two feet long and may grow to 3 feet long. That is a big fish. A fish this size needs room to swim and grow. But an even larger concern is that this fish uses very little of what it eats. More than 90% of the fish’s intake is expelled as waste.
A koi pond seldom has many plants in it as larger koi will eat almost any plants that grow on or below the water’s surface.
Koi are often costly and because of their bright colors, koi are susceptible to predators. In this area the primary predator of koi is heron, but raccoons can also present a problem. In addition, some times the design of the pond can cause damage to these “living jewels”.
Before you build your pond there are a lot of decisions that need to be made. Your first decision is what are you going to keep in your pond. Since you are building a koi pond, that decision has been made.
Next, you should determine the size and location of the pond. Let me give you a few pointers on this topic. First, water will naturally draw people to that area of your yard. By this I mean that if you don’t build it near your outdoor living area you will end up with a new outdoor living area – near the pond. Secondly, it should be close to and easily observed from your house. I guarantee that even while in your house you will look out to see the pond all the time. The closer, the better!
As for size, most people will tell you that you can’t make it too large. That isn’t necessarily true. If it is too large, it will be hard to see the fish or catch them when necessary. Your pond should be built so that all areas of the pond are within reach of a koi net extended to no more than fourteen feet. What this means is that you should be able to walk down one side of the pond or across a bridge and be able to reach every area of the pond. If you can’t do this, it means that you will have to use a seine net or have a helper every time you want to catch a fish in the pond. Yes, I know there are experienced pond keepers who break this design rule and can catch the fish. But it takes a great deal of experience to be able to do this. Or you are going to say, I don’t plan on having to catch any fish but that view is unrealistic.
If at all possible, the pond should not be in direct sunlight all day. Ideally, no more than four to six hours of direct sunlight should be on your pond during the summer. In the best arrangement, shade should be provided by a building or structure, but this isn’t always possible. If trees provide your shade, there will be a problem of debris from the trees getting into the pond. If it is not possible to avoid this situation, don’t worry about it. I am talking about ideal circumstances. I am always going to present the ideal ponds, but in building a pond there are always trade-offs from the ideal.
In future issues I will discuss pond design, skimmers, bottom drains, pumps, filtration, ultra-violet lights, ozone, aeration, plumbing and other pond equipment. Not everyone can build their ideal pond at the outset so I will also talk about pond building in stages based upon budgets.
©2004 all rights reserved to Mike White
THE INS AND OUTS OF KOI POND BUILDING by Mike White, White Water Filters PART 2: Design
PART 2: Design
In this series of articles I will not endorse any brands or manufacturers. I may talk about different manufacturers but if I don’t mention a particular company it in no way implies that I feel a product is inferior or doesn’t measure up. I will tell you what I would look for in a product. If a product meets the criteria I use, does not imply that it is the best, only that it meets the specifications I am looking for. All opinions expressed are my own.
This part will discuss pond design. The first item is the shape of the pond. In the first article I talked about the sized of the pond. The ideal shape is a perfect oval, however most people don’t construct a pond in a perfect oval. Why is the perfect oval ideal? This shape provides the best possible water circulation in the pond. The cross section of the pond should reveal a bowl shape. The bowl shape provides a good way to get the debris to the bottom drain. Once again, I am speaking of the “ideal” shape.
Now that we know what the ideal shape is and why it is considered such, you can work on determining the compromises you are willing to make to result in the aesthetic design you want.
There is more to pond design than size and shape. There are various pieces of equipment on the pond, circulation of the water and filtration equipment to be used.
Circulation of the pond is how the water moves through the pond. Our koi ponds are not stagnant pools but closed systems of circulating water. Water circulation can come from many sources, such as waterfalls, streams, jets, and return pipes. All the moving water is a result of water being moved by pumps.
Ideally the pumps should move the entire volume of water once per hour. In addition, “ideal” circulation would mean every drop of water in the pond is in constant motion. Most ponds accomplish water circulation through the use of waterfalls. If we are talking of the ideal way of moving water, this is actually the least preferable. Waterfalls can drastically affect the temperature of the water and bring large amounts of debris in. Waterfalls also attract birds, bringing additional undesirable elements into the pond in terms of parasites, waste, etc.
Water circulation can also be achieved through the use of air injected into the water. Air is the most efficient way to move water.
I have yet to see a pond with ideal circulation. Most ponds have very poor circulation and this can be a major cause of problems. The movement of water is very difficult to see at best or impossible. The use of a dye or colorant can help illustrate how the surface of the pond circulates. The reason I say “surface” is because when the water has colorant in it, it makes it hard to see through the surface to the water lower down.
Next I would like to address devices that allow water to be moved outside the pond. The first of these is a skimmer. The purpose of a skimmer is to remove surface debris. The first skimmers used on ponds were swimming pool skimmers. About 25 years ago a company called Aquascape Designs incorporated the design of swimming pool skimmers into a larger container. With the use of a net instead of a basket, more debris was allowed to collect before the skimmer became full. Approximately 16 years ago Pond Supplies of America radically changed this design. Instead of using a swimming pool weir, they used a device they call a bellows. A weir is supposed to take the water just off the surface of the pond. A swimming pool weir is designed to allow water to enter the skimmer not only from the surface but also to a depth of about 5 inches. This decreases the efficiency of the weir. Pond Supplies of America designed their bellows so that only the surface water is taken into the skimmer, improving the efficiency of the skimmer. Since that time, there has been an explosion of skimmers on the market; some good and some not so good.
When looking for a skimmer one should inspect how the skimmer is built. A skimmer is typically buried in the ground. The pressure of the dirt around it tends to deform the skimmer unless it is built strong enough to withstand this pressure. When the skimmer is deformed (misshapen), it cannot operate properly. Most modern skimmers have a net or basket to catch large debris and then a polyester pad to catch finer debris. These units provide mechanical, not biological, filtration. This means they mechanically remove debris from the water. Don’t worry about using chlorinated water to clean the net, basket or pad. Expect to have clean these items. The better they are working, the more often they will need to be cleaned. Recently brushes have been added to skimmer design to catch more debris. The vast majority of debris in a pond comes from outside sources such as leaves, seeds and pollution in the air. Of course I am talking about outdoor ponds as most ponds are located outdoors.
In the next article I will discuss other devices that move water outside the pond, pumps, and returning water to the pond.
©2004 all rights reserved to Mike White
THE INS AND OUTS OF KOI POND BUILDING by Mike White, White Water Filters PART 3: Circulation
PART 3: Circulation
In the last installment we discussed circulation a great deal. The reason circulation is an important topic is that everything that lives in the pond depends upon circulation or lack of circulation. Water circulation takes place both in the pond and outside the pond. To circulate water outside the pond it requires a force on the water to get it to move. This force commonly is either gravity, a pump or air.
Gravity and pumps are commonly used to circulate water outside a pond and are usually used in conjunction with each other. A pump is used to either lift water above the level of the pond so that gravity can be used to move it back to the pond. Or a pump sucks water out of a container attached to the pond, such as a skimmer or vortex settling chamber, and gravity returns water to the container to replace the water that has been removed.
Now I would like to discuss pumps. Pumps are usually classified as one of two types; submersible and external. Submersible pumps are designed to run submersed in water. If they run out of water, they will over heat. They are usually located in the skimmer or in the pond. Most submersible pumps are filled with oil to transfer the heat from the motor to the water. They usually have a life span of less than four years if used in a pond. It is usually not recommended to rebuild submersible pumps. Submersible pumps are easier to install and less costly. For these reasons, submersible pumps are used in ponds.
External pumps are located outside the pond and are cooled by the air. If an external pump is submersed in water it will short out the motor. External pumps use air for cooling. They usually have a life span of 7 to 10 years and normally can be rebuilt with no problem. External pumps are generally more energy efficient.
Regardless of the pump used, it should be matched to the application. Another concern is the amount of energy consumed as the typical pond in this area runs about 8 months a year, 24 hours a day and seven days per week. What sounds like a good deal when you buy the pump could end up not being the case.
How do you determine what is the best pump for your application? This is not a simple matter. First you must determine exactly what the application is and how much water will be required. Then the static and dynamic head pressure the system will have must be calculated. This can then be matched to the pump curve and that will determine which pump will work in your application.
Another means of circulating water is the use of gravity. Gravity is a constant force that pulls toward the center of the earth. Since water is a fluid, gravity is always going to try and pull the water to the lowest point it can flow to until it is contained. Once water is higher than the pond, as long as there is a path for the water to flow back to the pond, it will flow there. This is how a skimmer works or how a waterfall works. If you are using gravity to move water through a pipe, the sizing of the pipe becomes critical. In this case you should consult with an expert to make sure the diameter of the pipe is the correct size. Gravity is the cheapest way to move water but may not be the most efficient.
Using air to move water is a very efficient method if moving the water to a very limited height. The devices used are called air lift tubes. An air stone is placed in a body of water and then a pipe is placed over the air stone. The air going up the pipe moves water with the air out of the pipe. This can move a lot of water.
Why would water be circulated outside the pond? Some possible reasons could be to run a waterfall, stream, or filter.
I have discussed water circulation and equipment extensively for one reason; the better the circulation, the better the pond is going to operate. The poorer the circulation, the more problems there will be with the pond.
In the next installment I will discuss filtration.
©2004 all rights reserved to Mike White